|
How do I track webinar registrations in WebinarFuel?
Here’s how to track webinar registrations in WebinarFuel …
Step 1 – Add your Click Tracking Code to your Registration Page
Head to your Project Dashboard, click on the Tools menu, select "Website code", then choose “Custom Website Code” to get your Click Tracking Code as shown below:
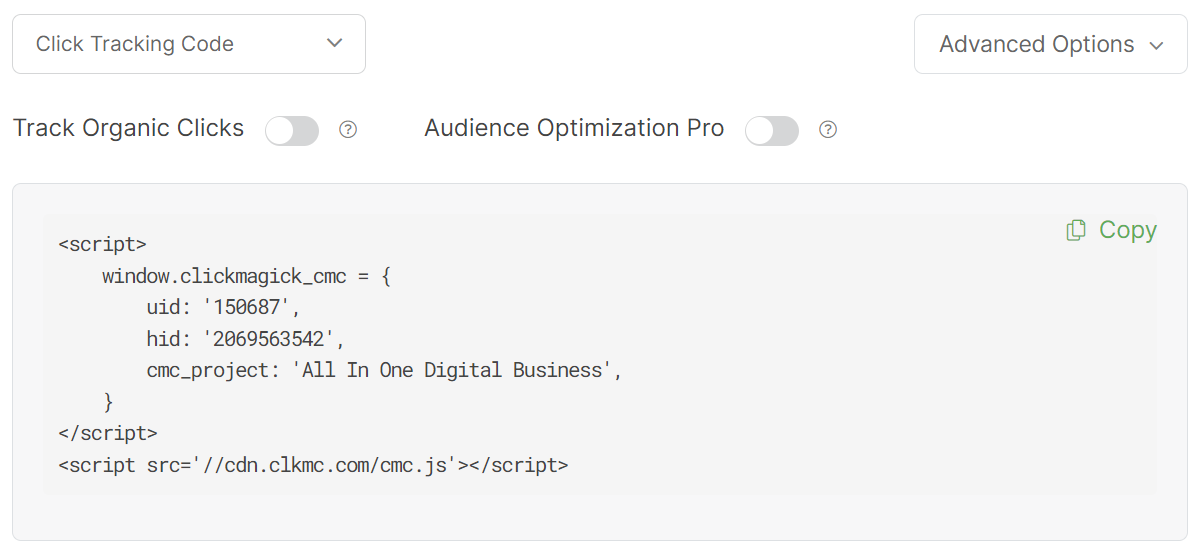
You can also get your Click Tracking Code below:
<script>

    window.clickmagick_cmc = {

        uid: '[USERID]',

        hid: '[HID]',

        cmc_project: 'NameOfYourProject',

        vid_info: 'on',

    }

</script>

<script src='//[CODE-DOMAIN]/[CODE-FILENAME].js'></script>
Be sure to change
NameOfYourProject between the 's to be your project’s name.Copy the Click Tracking Code, and add it to the registration page in your page builder:
How do I add tracking code or JavaScript to my page builder?
Step 2 – Add your Conversion Code to your Post-registration page
From your Project Dashboard, click on the Tools menu, select “Website Code”, then choose “Custom Website Code” and select Conversion Tracking Code:
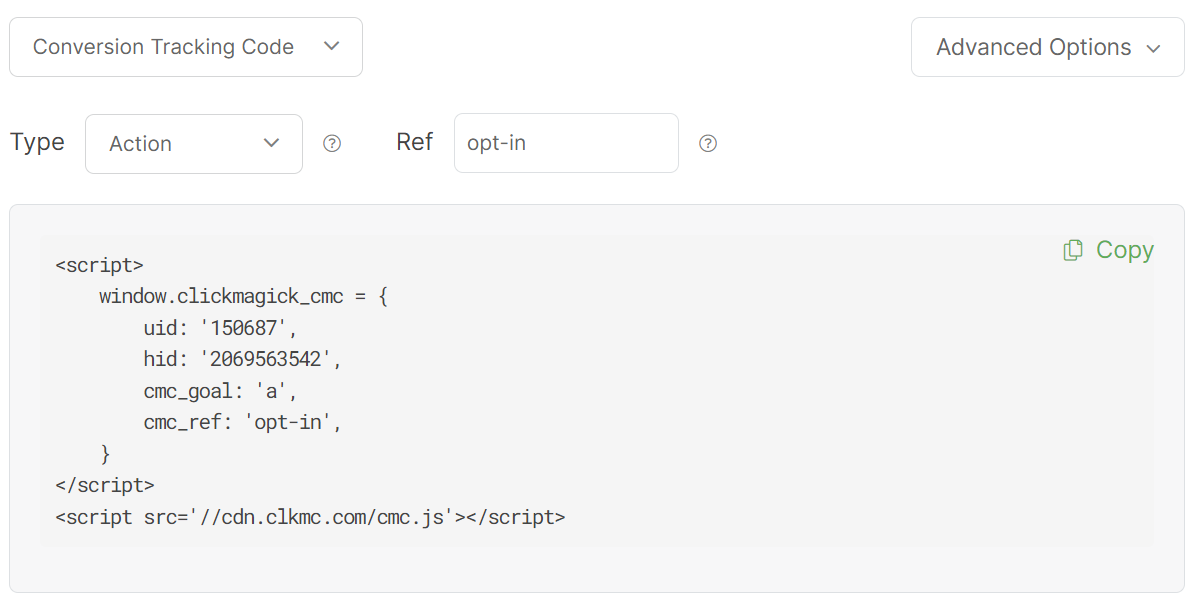
You could also get your Action Conversion Code below:
<script>

    window.clickmagick_cmc = {

        uid: '[USERID]',

        hid: '[HID]',

        cmc_goal: 'a',

        cmc_ref: 'wf-registered',

    }

</script>

<script src='//[CODE-DOMAIN]/[CODE-FILENAME].js'></script>
Back in your Page Builder, you'll want to add this code in the Header section of your thank you page.
Step 3 – Tracking the Webinar Room, Webinar Room Replay, or Saw CTA
Inside of WebinarFuel, select the webinar that you wish to track.
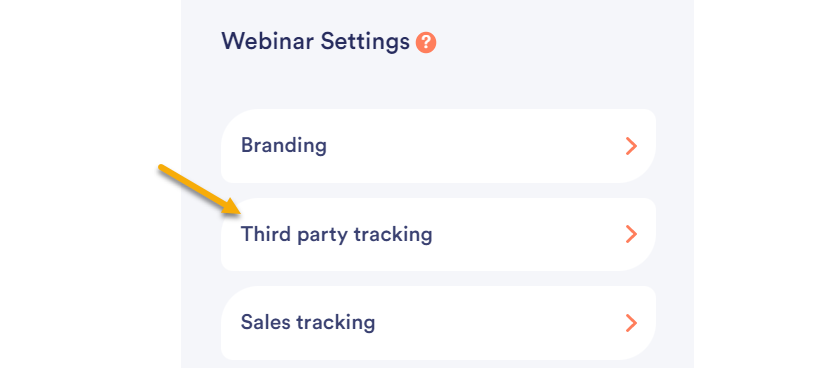
Then click on “Settings” in the top right corner and select “Third Party Tracking” as shown below:
In the Webinar Room, Webinar Room Replay and Saw CTA sections, you'll want to add your Engagement Conversion Code with the appropriate ref values. An example for the “Webinar Room” is below:
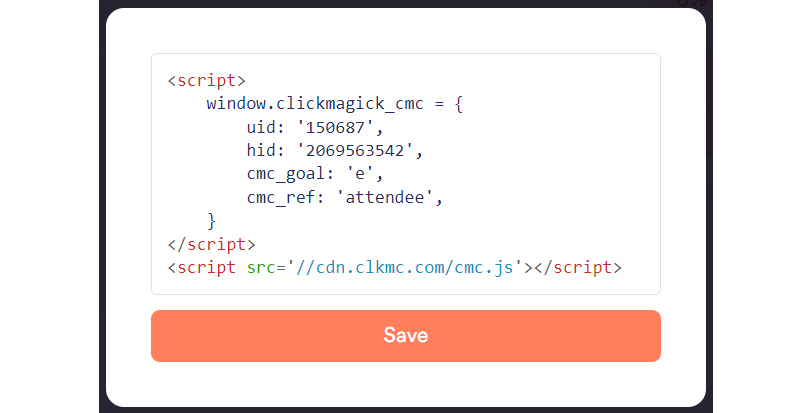
You can get your Engagement Conversion Code for your account below:
<script>

    window.clickmagick_cmc = {

        uid: '[USERID]',

        hid: '[HID]',

        cmc_goal: 'e',

        cmc_ref: 'attendee',

    }

</script>

<script src='//[CODE-DOMAIN]/[CODE-FILENAME].js'></script>
You’ll want to be sure you replace the
attendee value with what you want to be tracked as an Engagement in your Project.Next what you'll want to do is add the following URL Parameter:
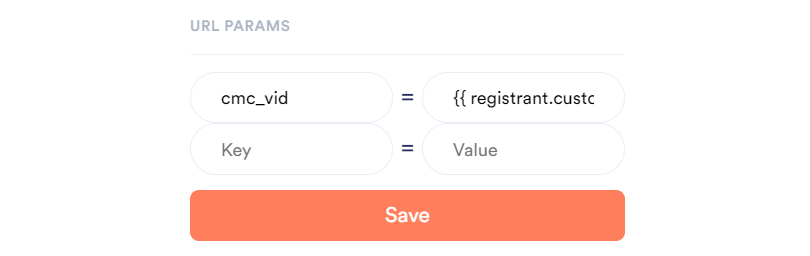
Key:
cmc_vidValue:
{{ registrant.custom_tracking_fields.cmc_vid }}Make sure to save your changes.
Step 4 – Tracking Sales From The Webinar
If you are selling your own products and services using a platform like ThriveCart, then you'll want to set up Sales Tracking as explained in the article below:
How do I set up the ThriveCart sales tracking integration?
To correctly send the Visitor ID to your ThriveCart checkout page, you'd need to edit the Button Link in WebinarFuel.
To edit the button, click on the button to the left of “Settings” at the top right:

Then, click on the button on the step that you want to go to the checkout page, and change the action to “Go to URL”:
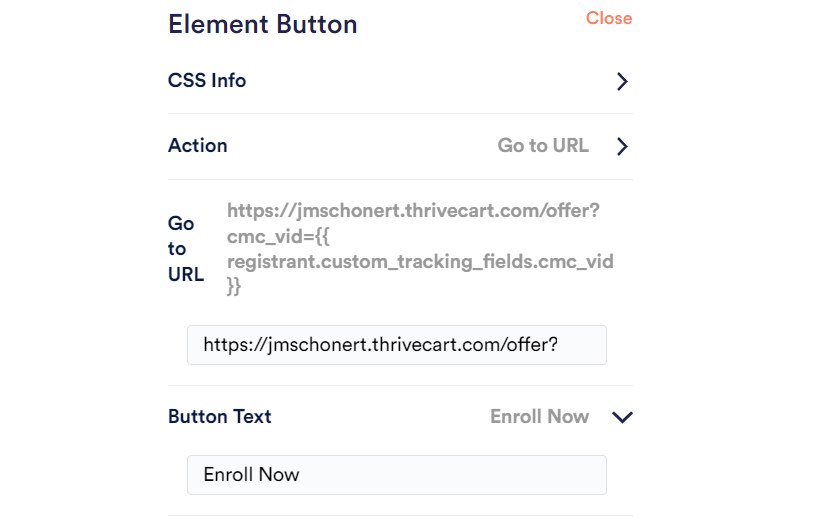
The Button Link should end with:
?cmc_vid={{ registrant.custom_tracking_fields.cmc_vid }}For example if your ThriveCart checkout page link is:
https://[USERNAME].thrivecart.com/offerThen you add
?cmc_vid={{ registrant.custom_tracking_fields.cmc_vid }}, it should look like this:https://[USERNAME].thrivecart.com/offer?cmc_vid={{ registrant.custom_tracking_fields.cmc_vid }}If you are promoting products as an affiliate, then you’ll want to modify your affiliate link so that it has the correct Affiliate ID Parameter.
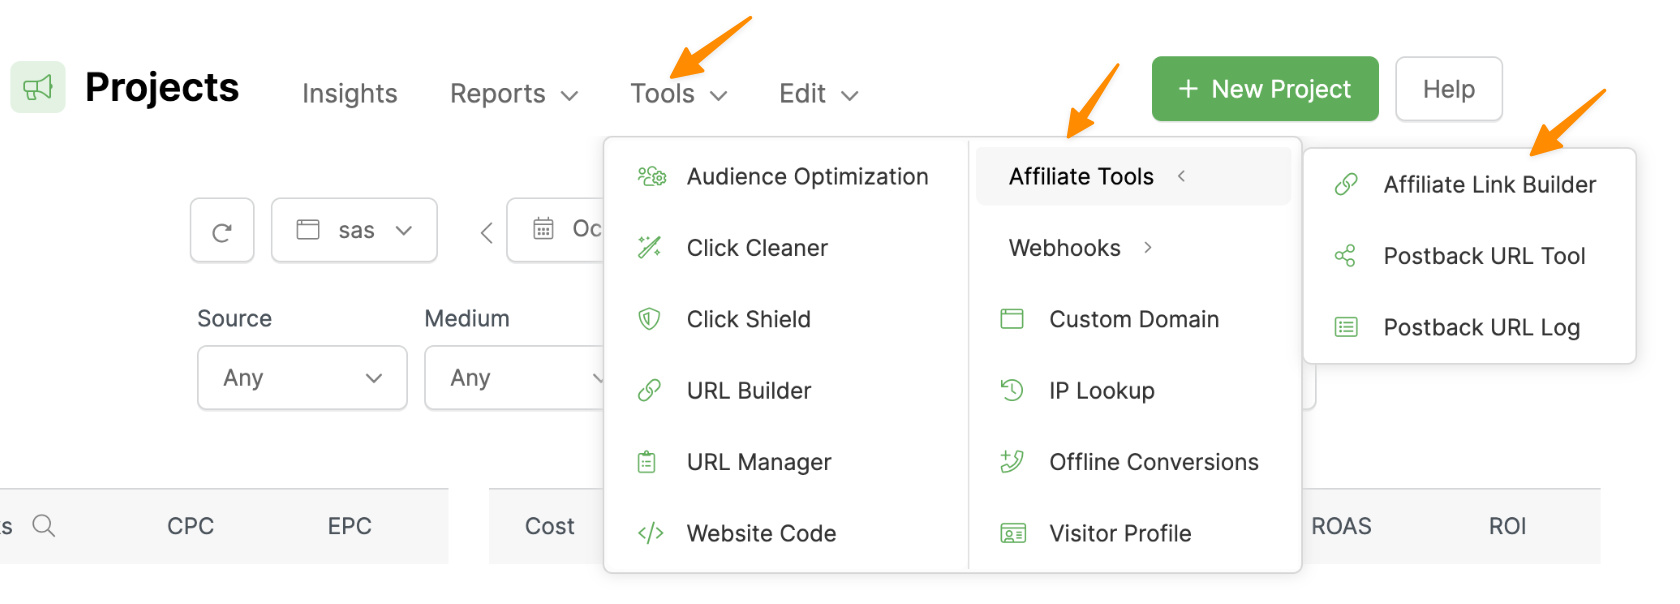
You can do this by heading to your Project Dashboard and selecting Affiliate Link Builder from the Tools Menu:
Next, select your affiliate network from the menu, paste your affiliate link into the edit box and click on the “Update My Affiliate Link” button.
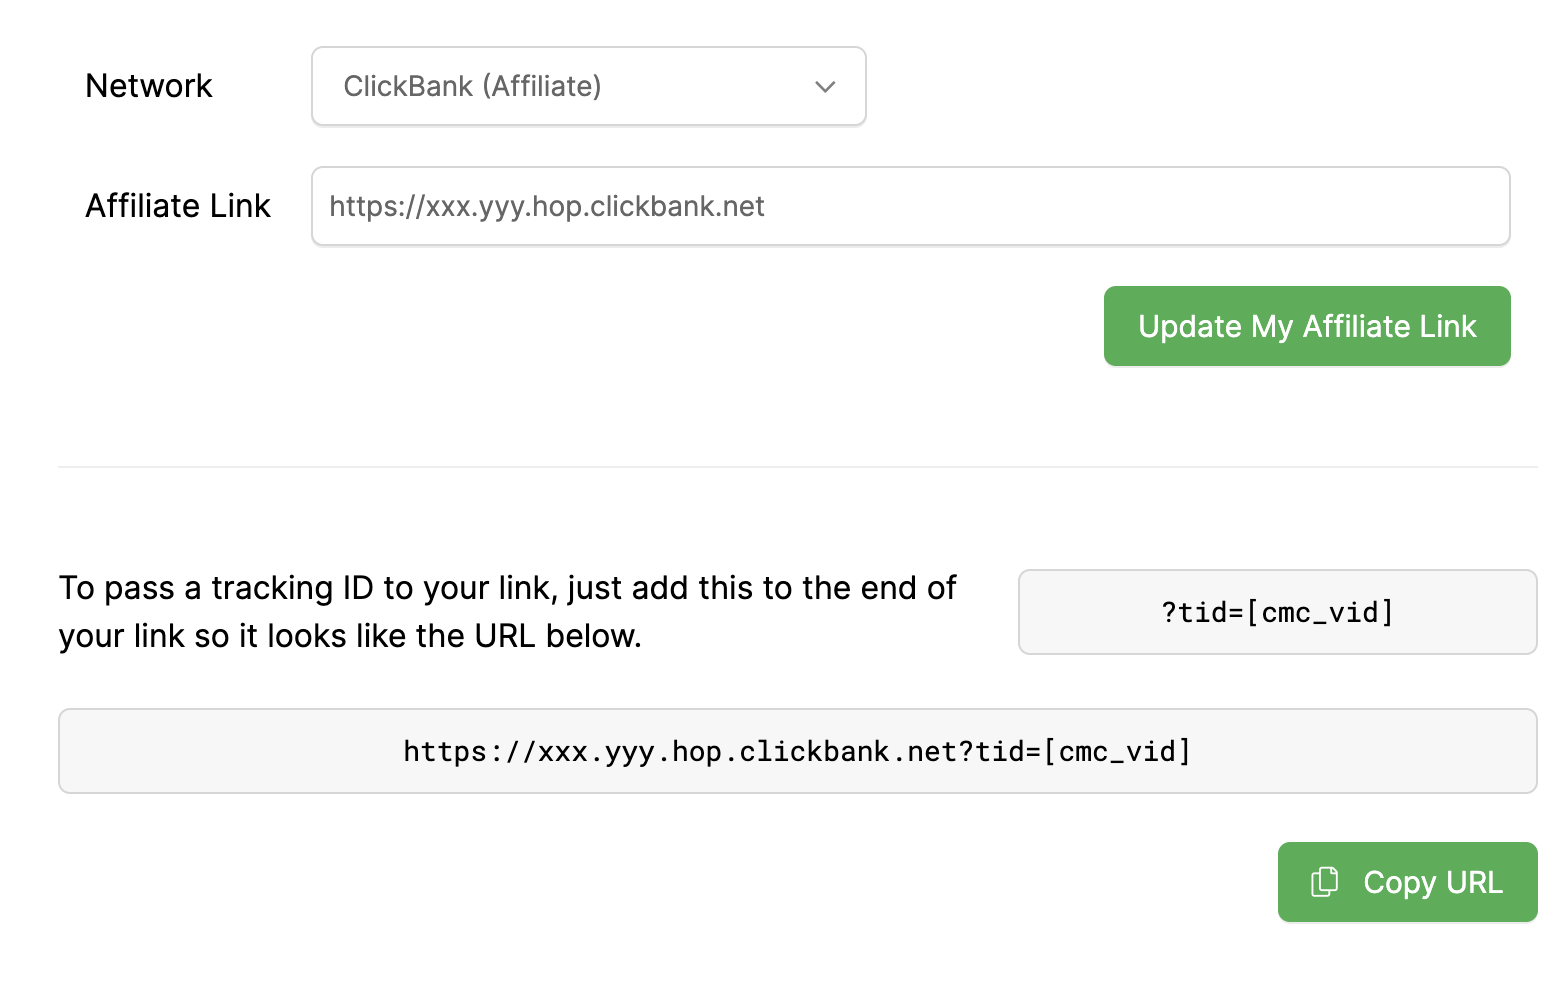
You won’t be using the modified link exactly in your webinar.
Instead, you’ll strip out the end
[cmc_vid] and use {{ registrant.custom_tracking_fields.cmc_vid }}.So in the case of ClickBank, your affliate would go from being:
https://xxx.yyy.hop.clickbank.net?tid=[cmc_vid]To being:
https://xxx.yyy.hop.clickbank.net?tid={{ registrant.custom_tracking_fields.cmc_vid }}And that’s it! Just start sending traffic to your webinar registration page using UTM Parameters and ClickMagick will begin to track your registrations.
Article 770 Last updated: 10/22/2025 12:59:00 AM
https://www.clickmagick.com/kb/?article=770