|
How do I track my recurring revenue?
Note: Our core sales tracking integrations – for example with ClickFunnels or HighLevel – automatically track all of your recurring revenue.
So if you’re already using one of these integrations, you don’t need to follow the steps outlined on this page unless you are generating recurring revenue outside of the primary platform you use to process your sales.
So if you’re already using one of these integrations, you don’t need to follow the steps outlined on this page unless you are generating recurring revenue outside of the primary platform you use to process your sales.
If you need to track recurring revenue we currently have integrations for Stripe, PayPal and Authorize.net.
We also support postbacks and webhooks so you can use something like Zapier to send your recurring revenue data to ClickMagick from any other apps or platforms you use.
Rather than having you link your entire Stripe account to ClickMagick, you’ll set up the integration manually.
It’ll only take a few minutes, and in this way we won’t have access to all of your Stripe data that we don’t need to track your recurring revenue, which is just better for everyone.
Before getting started, it’s important to know that the Stripe integration is only for the tracking of recurring payments and any refunds of those recurring payments. You’ll continue to track your initial sales, and any other one-time sales, normally as you do now.
With that being said, please follow the simple steps below …
Step 1 – Capture visitor info in ClickMagick if you aren’t already
The tracking of recurring sales in Stripe is based on the customer’s email address, so the first step is to start capturing visitor info in ClickMagick if you aren’t already doing so. You can learn more in the article below:
What are the different ways to capture visitor info in ClickMagick?
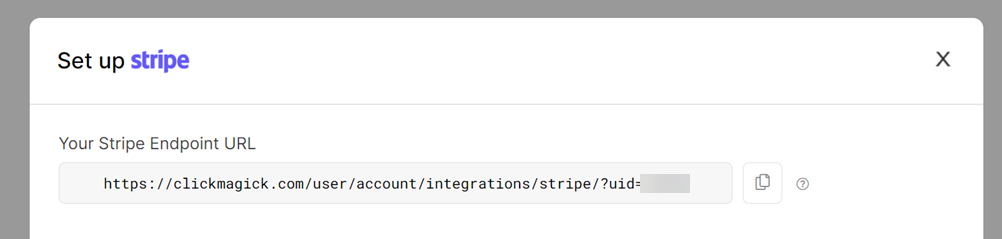
Step 2 – Copy your ClickMagick Stripe Endpoint URL
Navigate to your ClickMagick Integrations page, click the “Set up Stripe” button, and copy your Stripe Endpoint URL at the top of the screen, which you’ll need in the next step.
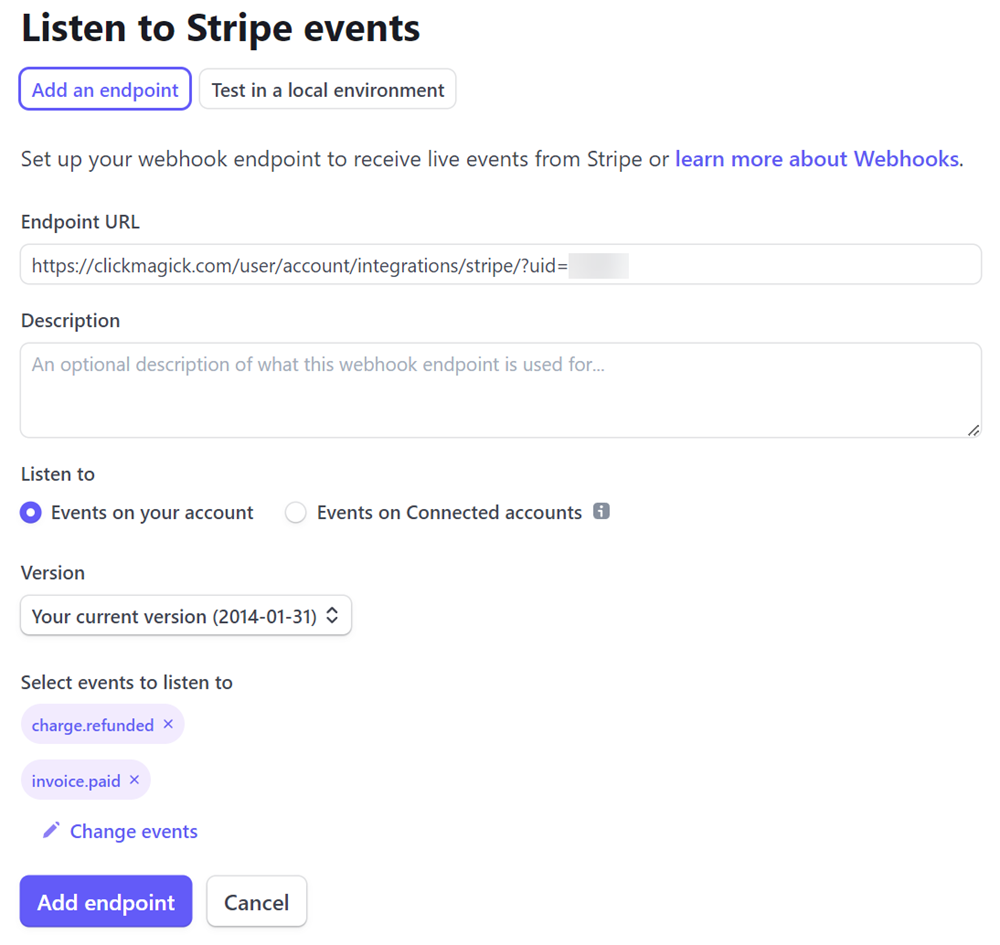
Step 3 – Add a new ClickMagick Endpoint in Stripe
Login to your Stripe account, navigate to your Webhooks page, click “+ Add Endpoint”, then Paste in your Endpoint URL from the previous step.
Next click “+ Select events”. Under the “Charge” category, select only the
charge.refunded event. Under the Invoice category, select only the invoice.paid event. Do not select any other events other than these two.When you’re ready, click “Add events”, and then “Add endpoint”.
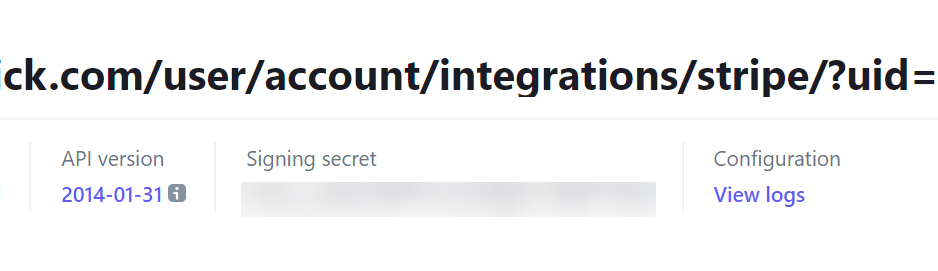
Step 4 – Copy your Stripe Webhook Signing Secret
On the next screen, click “Reveal” under “Signing secret”. Copy the secret value which you’ll need in the next step.
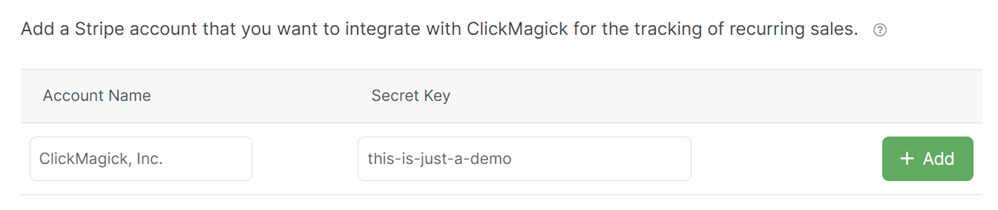
Step 5 – Add Stripe accounts you want to integrate in ClickMagick
Back in ClickMagick, enter your Stripe “Public business name” as the Account Name, and your Signing Secret. You can copy and paste your Public business name from your Public business information page in Stripe. It has to match exactly.
Be sure to click “+ Add” to add this Stripe account to ClickMagick, and repeat this process for any other Stripe accounts you want to integrate with ClickMagick.
Step 6 – Add your Stripe Subscription Plans in ClickMagick
Finally, you just need to tell ClickMagick about your subscriptions ...
For each subscription plan that you have, select the Stripe Account Name, enter the exact “Price Description” from Stripe, select the ClickMagick project you want recurring revenue to be attributed to, and select whether you want to include or exclude tax in the recurring revenue amounts.
Be sure to click “+ Add” to add each subscription plan, and repeat this process for all the subscriptions you want to track in ClickMagick.
Where do I find the Price Description?
You can find the Price Description for each of your subscriptions from your Products page in Stripe …
First click on the Product name. Then at the top under Pricing, click the 3 dots to the far right of the price and select Edit Price. Then you’ll find the Price Description near the bottom under “Advanced.”
This field must be filled in with a “Price Description” of your choosing (it’s not shown to customers).
So if you already have a Price Description, just copy it over to ClickMagick. Otherwise enter a Price Description and hit Update in Stripe, then copy over the Price Description into ClickMagick.

And that’s it, you’re done!
Before getting started, it’s important to know that the PayPal integration is only for the tracking of recurring payments and any refunds of those recurring payments. You’ll continue to track your initial sales, and any other one-time sales, normally as you do now.
With that being said, please follow the simple steps below …
Step 1 – Capture visitor info in ClickMagick if you aren’t already
The tracking of recurring sales in PayPal is based on the customer’s email address, so the first step is to start capturing visitor info in ClickMagick if you aren’t already doing so. You can learn more in the article below:
What are the different ways to capture visitor info in ClickMagick?
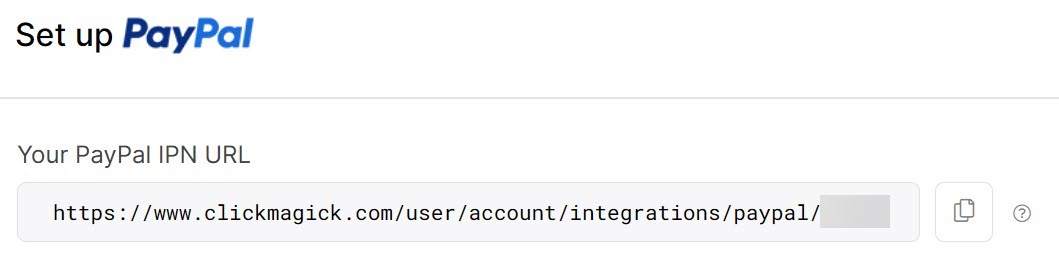
Step 2 – Copy your ClickMagick PayPal IPN URL
Navigate to your ClickMagick Integrations page, click the “Set up PayPal” button, and copy your PayPal IPN URL at the top of the screen, which you’ll need in the next step.
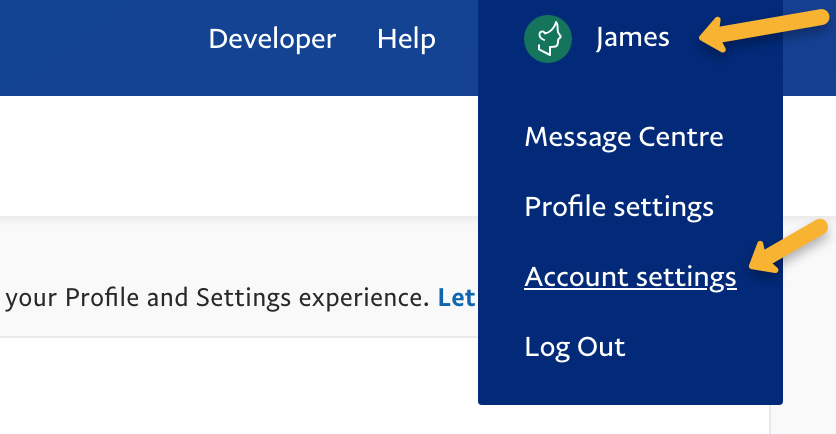
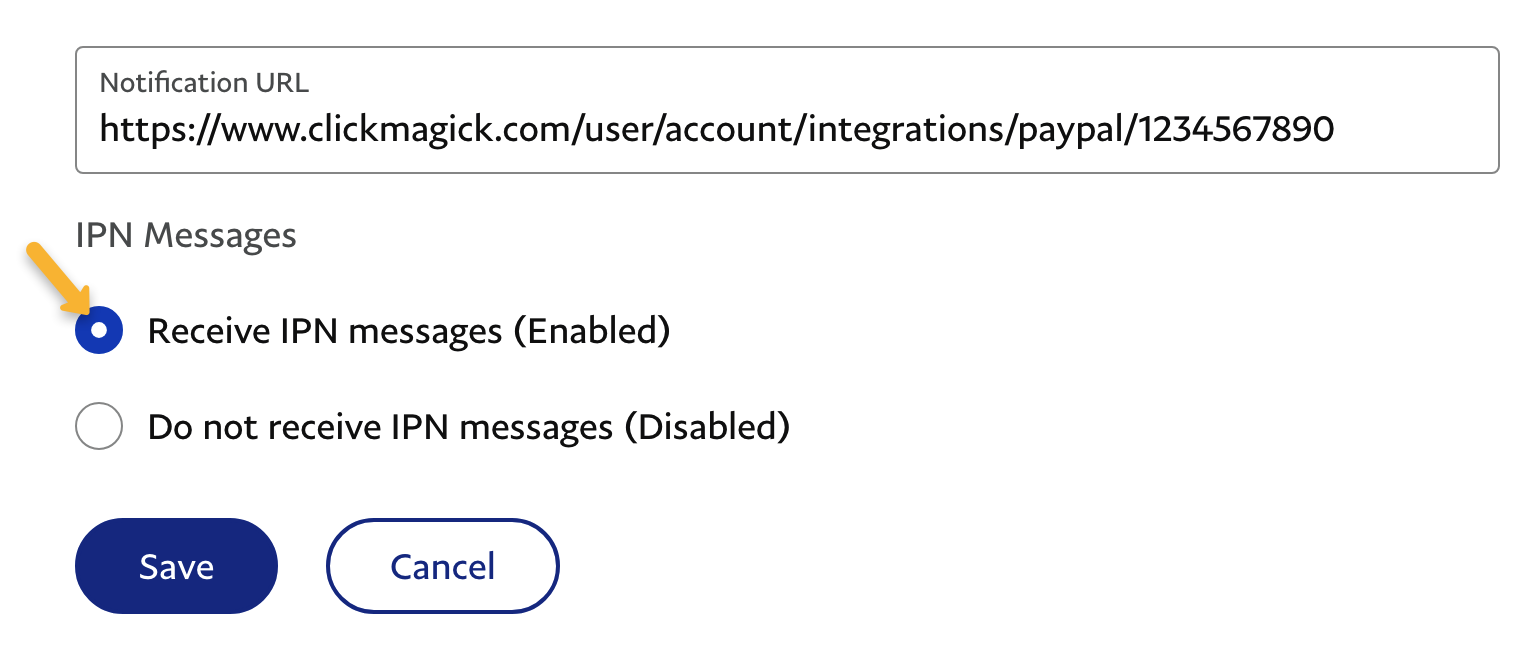
Step 3 – Add a new IPN URL in PayPal
Login to your PayPal account, go to “Account Settings” in the top right hand corner.
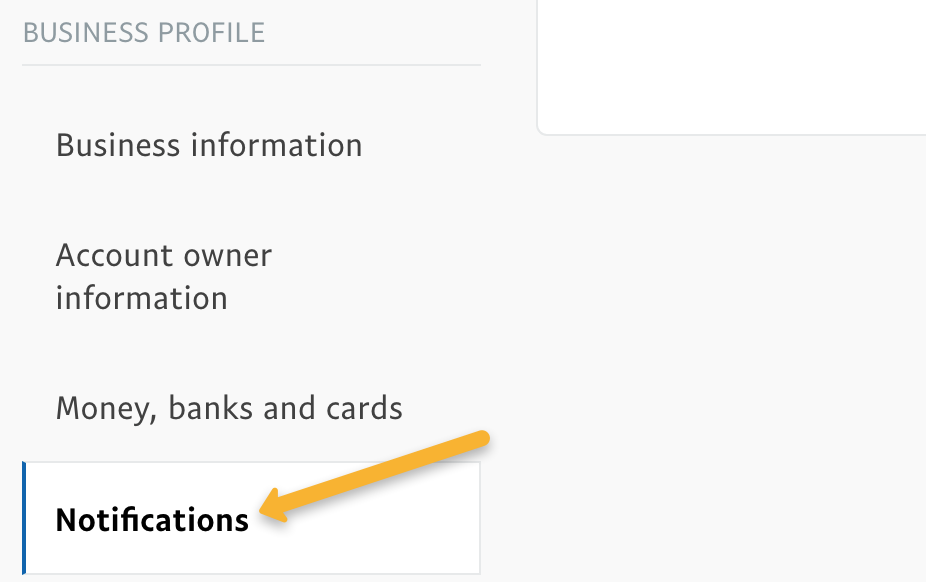
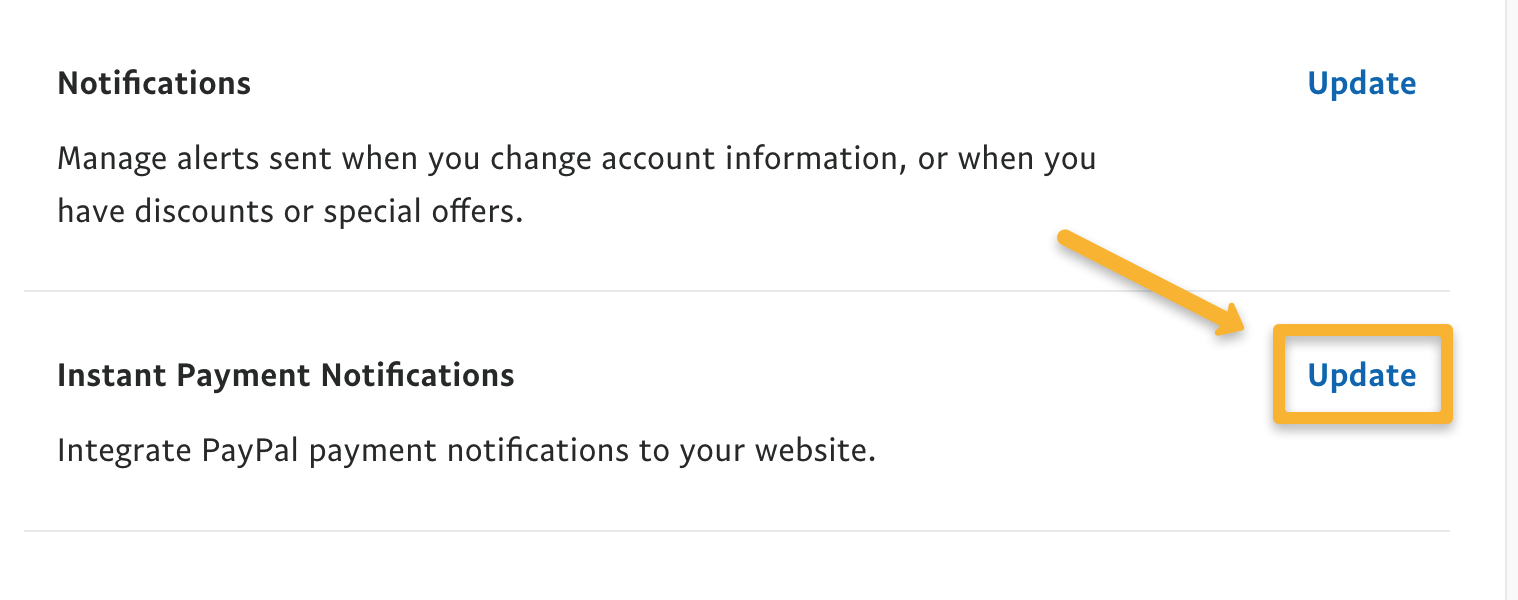
Next, click on “Notifications”, then “Update” next to “Instant Payment Notifications”.
Click on “Choose IPN Settings”, then paste in the IPN URL you copied from ClickMagick earlier. Make sure “Receive IPN messages (Enabled)” is selected.
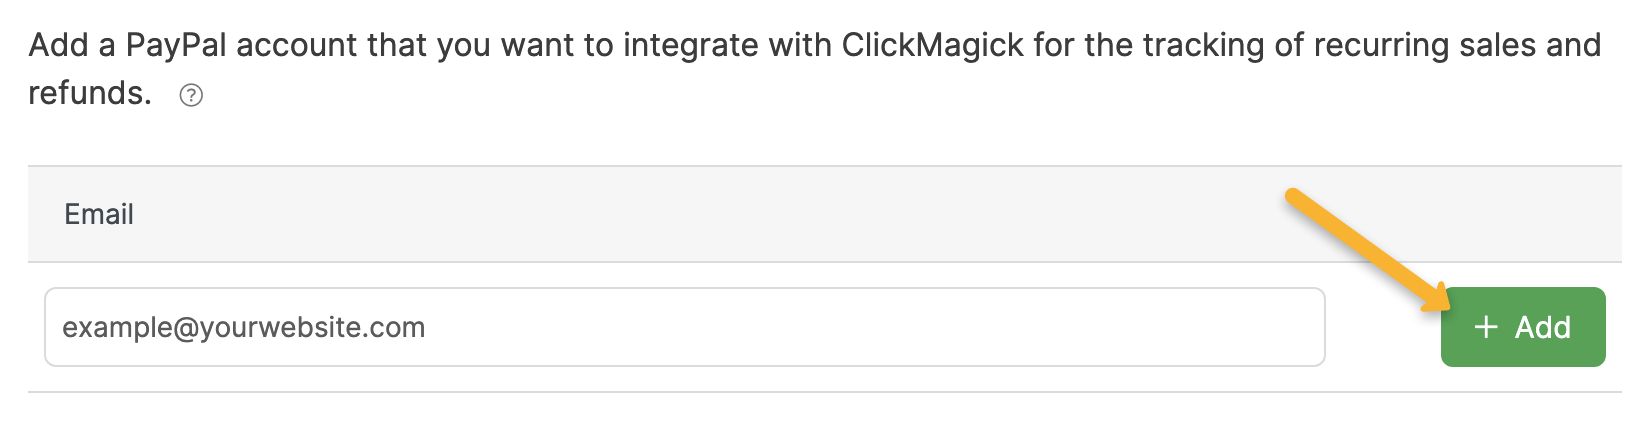
Step 5 – Add PayPal accounts you want to integrate in ClickMagick
Back in ClickMagick, enter the email address of the PayPal account you’re integrating.
Be sure to click “+ Add” to add this PayPal account to ClickMagick, and repeat this process for any other PayPal accounts you want to integrate with ClickMagick.
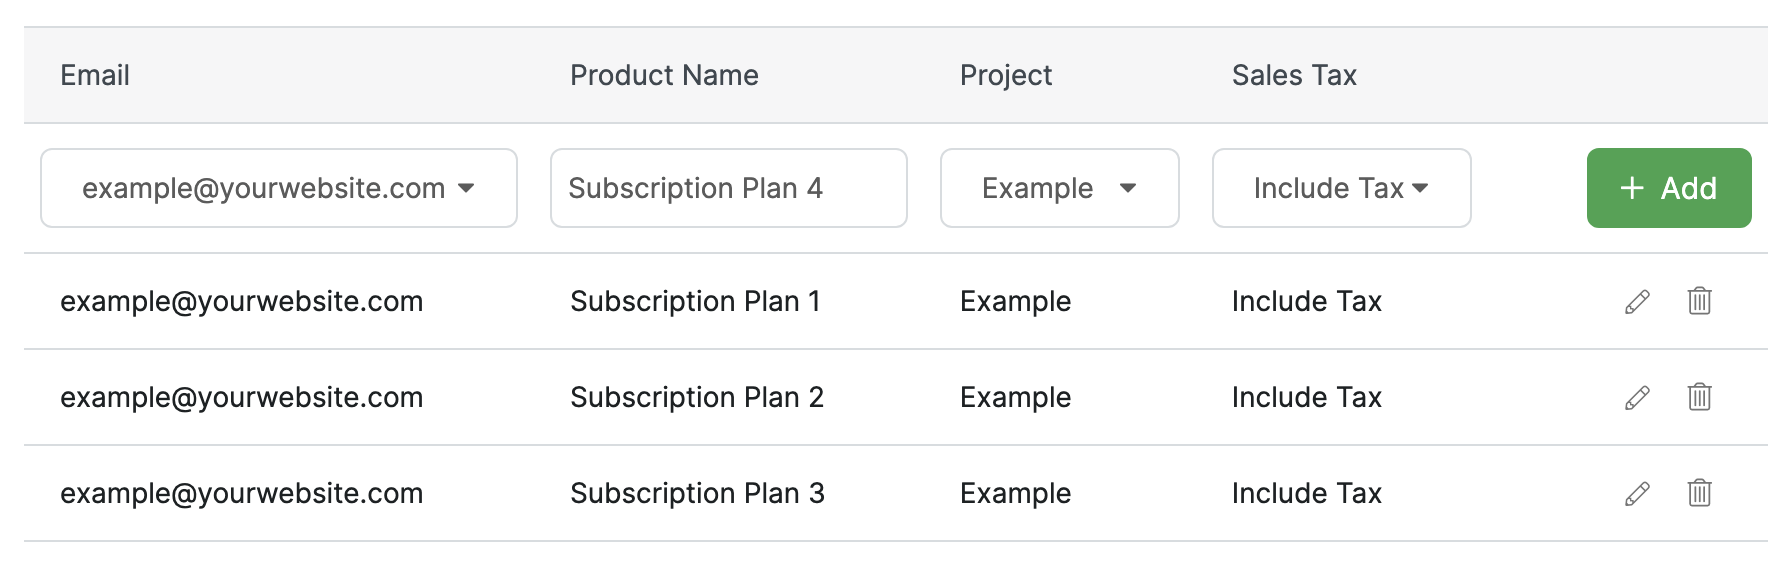
Step 6 – Add your PayPal Subscription Plans in ClickMagick
Finally, you just need to tell ClickMagick about your subscriptions ...
For each subscription plan that you have, select the PayPal account email, enter the Product Name from PayPal, select the ClickMagick project you want recurring revenue to be attributed to, and select whether you want to include or exclude tax in the recurring revenue amounts.
You can get the exact Product Names you need from your Subscriptions page in PayPal. Note they have to match exactly.
Be sure to click “+ Add” to add each subscription plan, and repeat this process for any other subscriptions you want to track in ClickMagick.
You’re done!
Before getting started, it’s important to know that the Authorize.net integration is only for the tracking of recurring payments and any refunds of those recurring payments. You’ll continue to track your initial sales, and any other one-time sales, normally as you do now.
With that being said, please follow the simple steps below …
Step 1 – Capture visitor info in ClickMagick if you aren’t already
The tracking of recurring sales in Authorize.net is based on the customer’s email address, so the first step is to start capturing visitor info in ClickMagick if you aren’t already doing so. You can learn more in the article below:
What are the different ways to capture visitor info in ClickMagick?
Step 2 - Register your ClickMagick Webhook in Authorize.net
Log in to Authorize.net and make sure you’re on the “Home” page. Click the “Settings” button on the left side.

Next, click on “Webhooks” under “Business Settings”.

Click on “Add Endpoint” and enter the following details:
| Name | ClickMagick Sales Webhook |
| Delivery URL | https://www.clickmagick.com/user/account/integrations/authnet/[USERID] |
| Status | Active |
| Select Events | All Events |
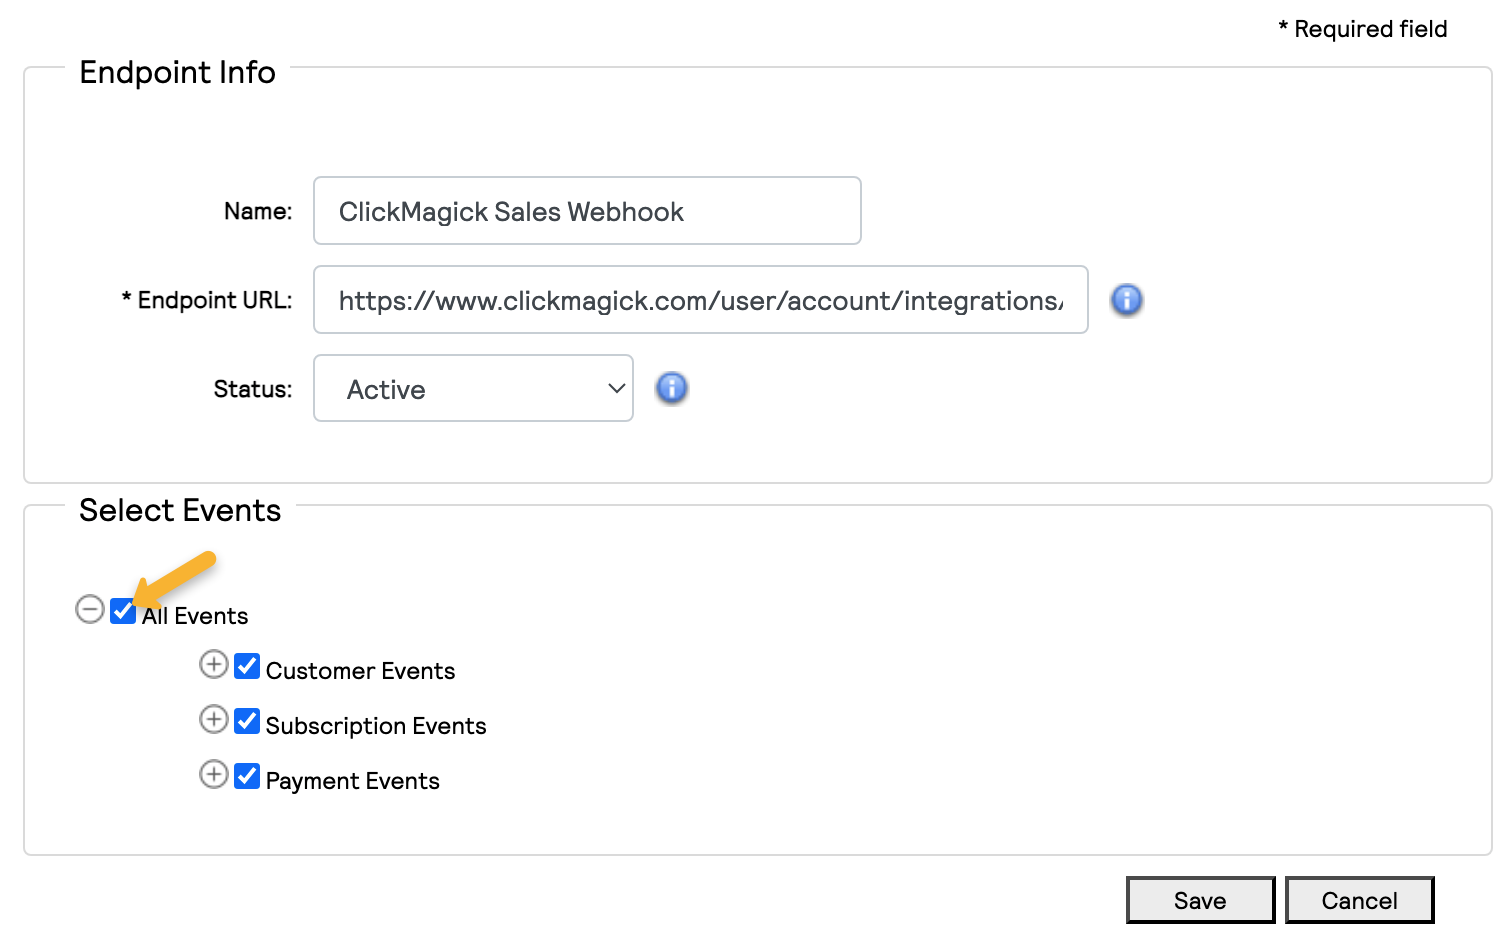
Once you’ve done that, just hit “Save”.
Step 3 - Add your Login ID, Transaction Key and Signature Key to ClickMagick
Go back to the “Home” page of your Authorize.net account and click on “Settings”.
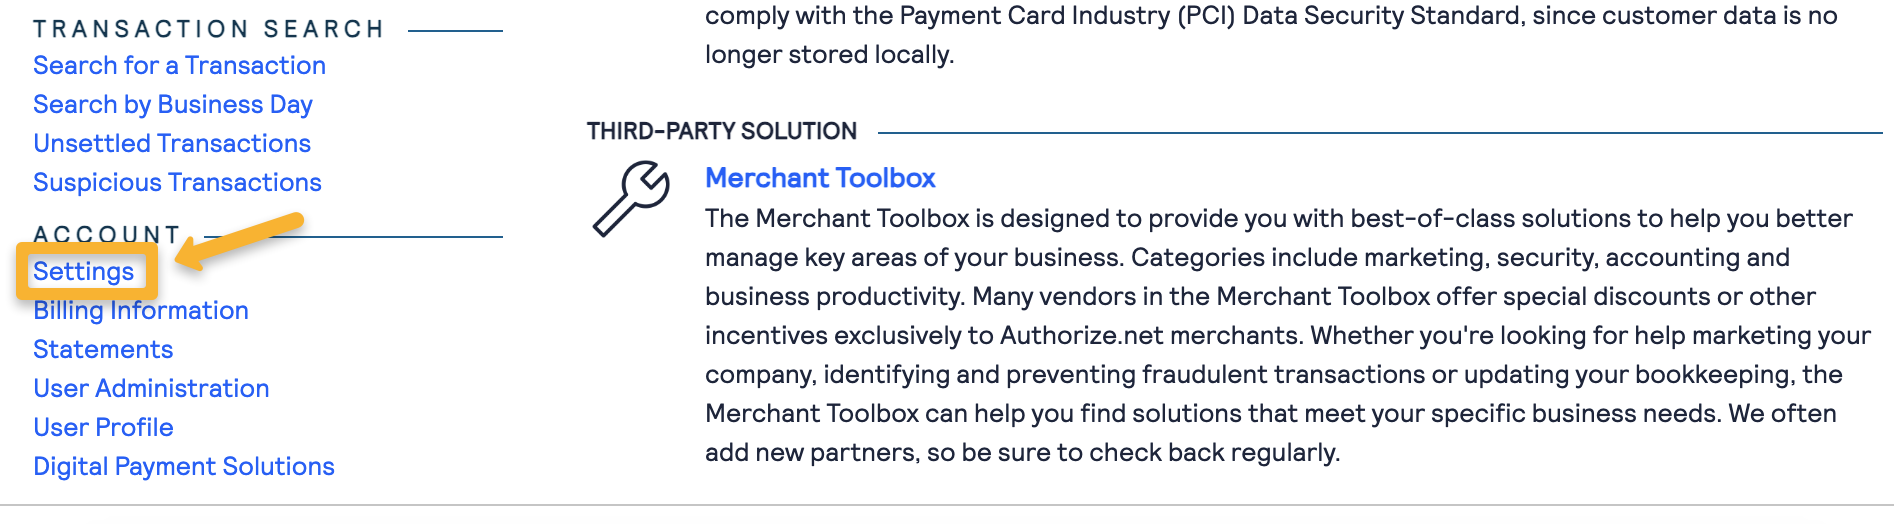
Click on “API Credentials & Keys”.

Copy the “API Login ID”.
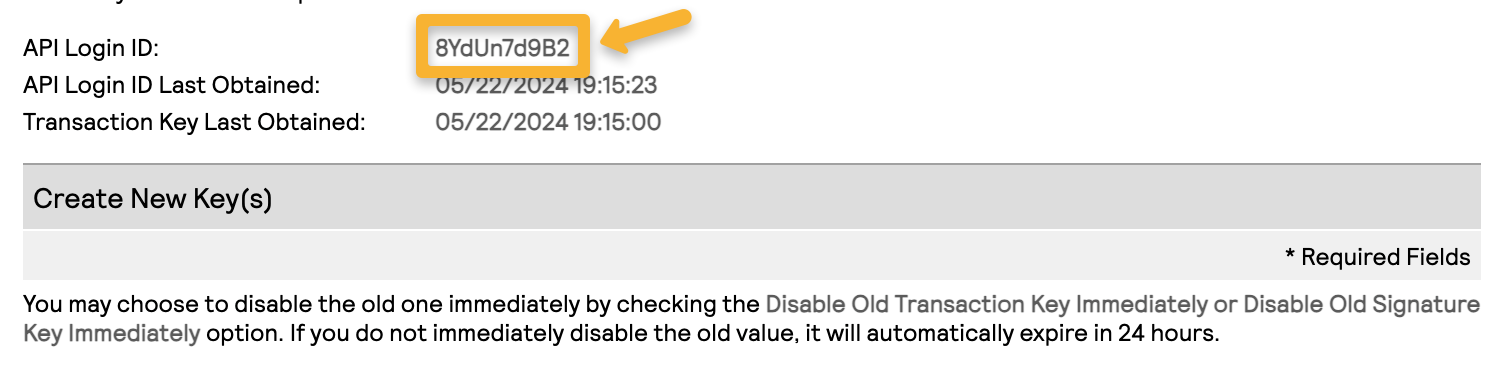
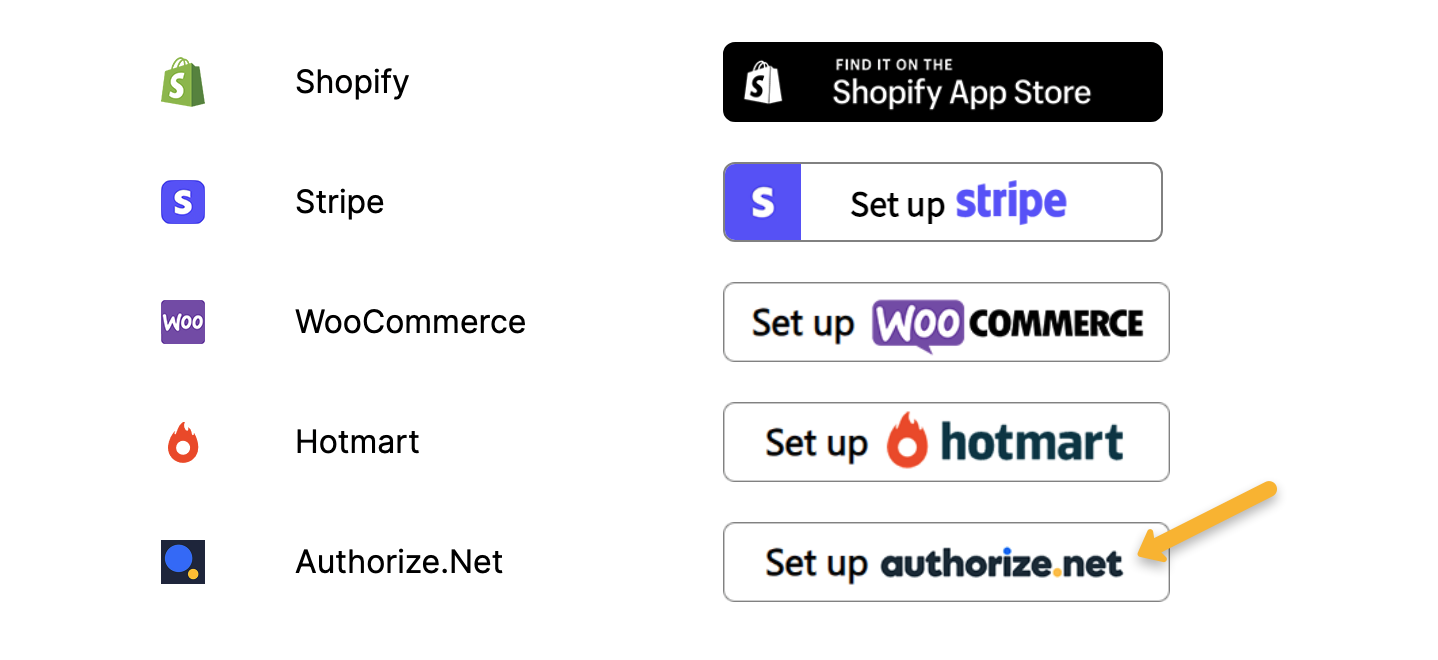
Once you’ve copied your API Login ID, head to the Integrations Page in ClickMagick. Then click on “Set up Authorize.net”.
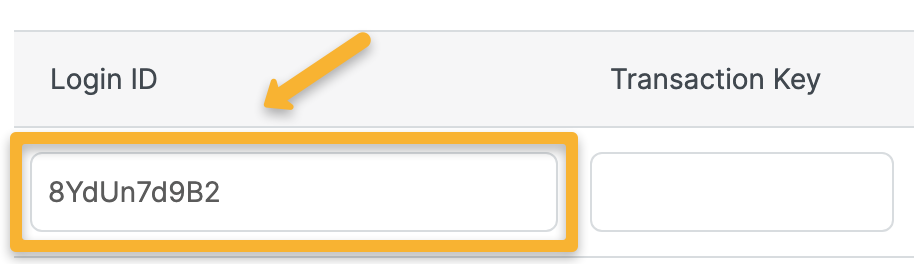
Paste your API Login ID into the “Login ID” box.
Once you’ve done that, head back to Authorize.net and select “New Transaction Key”, then click on “Submit”.
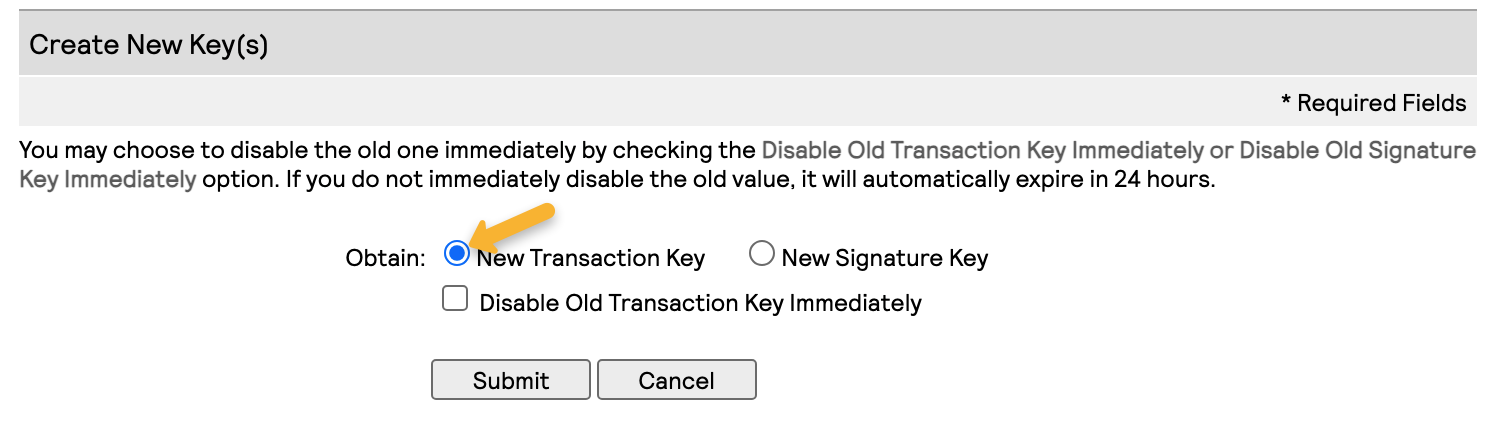
Note: Authorize.net may ask you to verify your identity at this stage. Just submit the PIN they send to your email address and continue with the process.
Copy the Transaction Key.
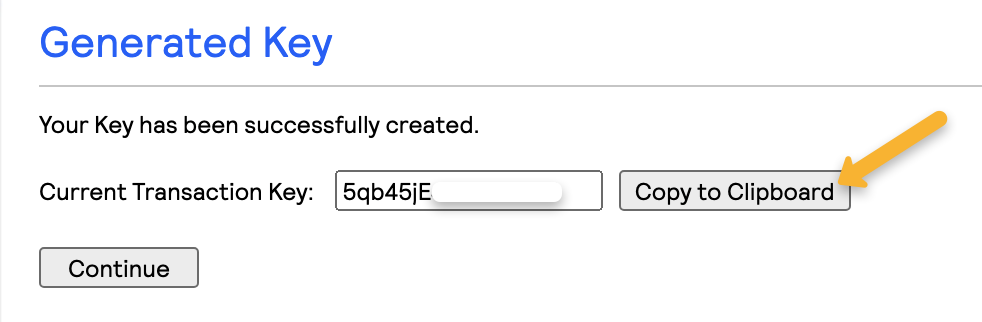
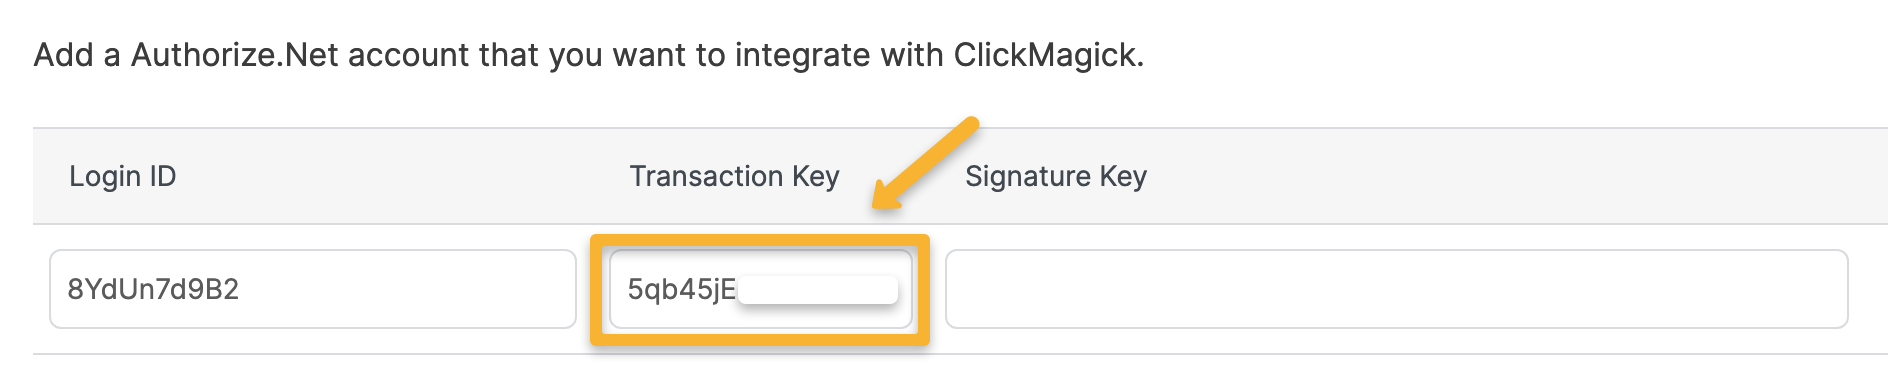
Head back to ClickMagick and paste this into the “Transaction Key” box.
Go back to Authorize.net and hit “Continue”. Then go back to the “API Credentials & Keys” section and click on “New Signature Key” and hit “Submit”.
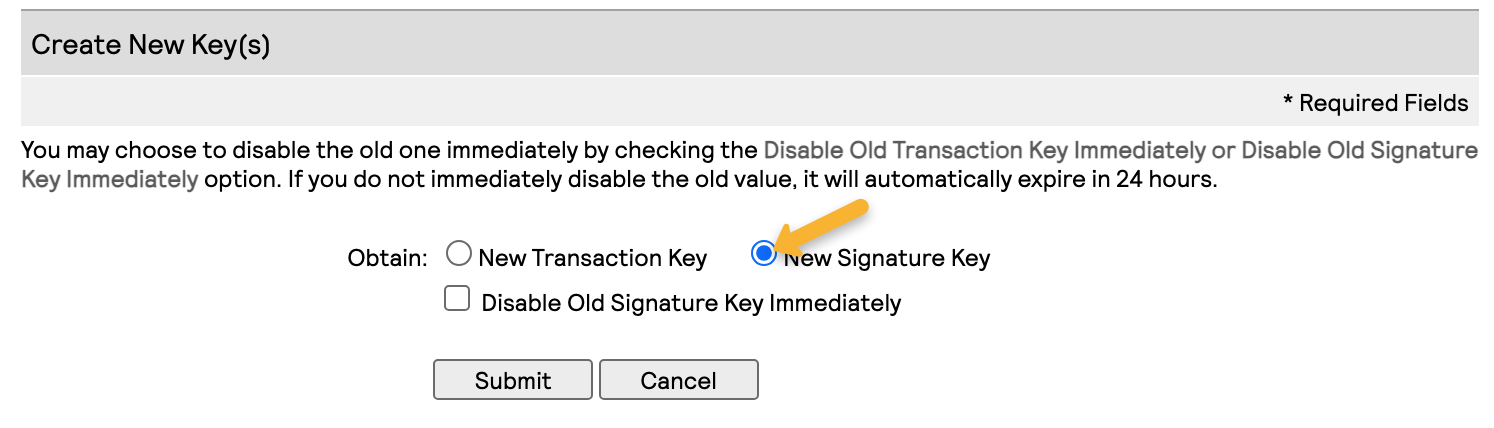
Copy the Signature Key.

In ClickMagick, paste this Signature Key into the “Signature Key” box. Then click on “+ Add”. You can add as many different Authorize.net accounts as you need.

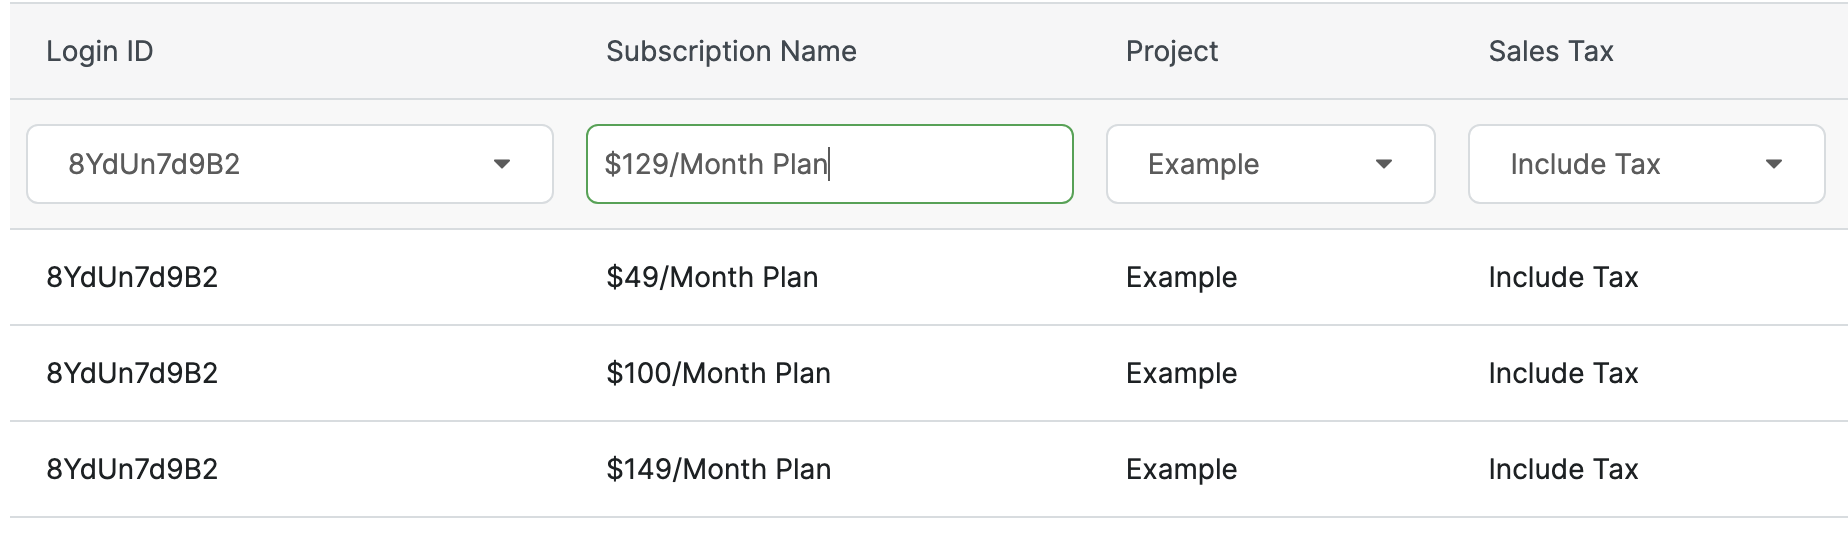
Step 4 – Add your Authorize.net Subscription Plans to ClickMagick
Finally, you just need to tell ClickMagick about your subscriptions ...
For each subscription plan that you have, select the Authorize.net Login ID, enter the Product or Subscription Name from Authorize.Net, select the ClickMagick project you want recurring revenue to be attributed to, and select whether you want to include or exclude tax in the recurring revenue amounts.
You can get the exact Product/Subscription names you need from your Automated Recurring Billing page in Authorize.net. Note the subscription names have to match exactly.
Be sure to click “+ Add” to add each subscription plan, and repeat this process for any other subscriptions you want to track in ClickMagick.
That’s it! Recurring sales and refunds will now be sent from Authorize.net to ClickMagick.
Sending recurring revenue back to ClickMagick via a Postback URL or Webhook is a simple process.
Just follow the steps below to set it up …
Step 1 – Capture visitor info in ClickMagick if you aren’t already
The tracking of recurring sales via postback is based on the customer’s email address, so the first step is to start capturing visitor info in ClickMagick if you aren’t already doing so. You can learn more in the article below:
What are the different ways to capture visitor info in ClickMagick?
Step 2 – Copy your ClickMagick Postback URL below
Copy the Postback URL below and make the necessary changes to replace the
{EMAIL ADDRESS} and {AMOUNT} tokens with the correct values or tokens for your system.https://www.clkmg.com/api/s/post/?uid=[USERID]&s1={EMAIL_ADDRESS}&amt={AMOUNT}&ref=recurringStep 3 – Add the Postback URL to your backend
Add the URL from Step 2 to whatever system is going to be sending your recurring revenue and refunds to ClickMagick. They’ll normally refer to this URL as your “notification URL” or “webhook endpoint.”
This process will differ for every platform, so if you have any questions at all just contact our Help Desk and we’ll be happy to help. That’s it, you’re done!
Article 900 Last updated: 11/17/2025 12:32:45 PM
https://www.clickmagick.com/kb/?article=900